DIY Colouring Book Pages
Let’s have some fun learning how to create a colouring book from your photographs.
We all love to take pictures: snap shots of the kids, vacation photos, birthday celebrations, fur babies… But, what do we do with them? If you are like me you have a computer hard drive, your phone’s cyber space cloud account, and / or multiple USB drives and HD cards filled with picture files. Not to mention those boxes and albums full of photos sitting in the corner or collecting dust on a shelf.
It’s time to pull them out, sift through them and find some really cool ones to play with.


This post may contain affiliate links. This means if you click through and / or make a purchase through one of these links, I may receive a small commission, at no extra cost to you. All opinions are my own. Please read my full disclosure HERE.
Colouring books are all the rage! Kids have always loved to colour. Colouring promotes hand strength and fine motor skills, helps develop colour awareness and boosts creative expression. What would be better than having a book of their very own pictures!

Adult colouring books help to reduce stress, boost concentration and promote creativity. It seems the more complex the pictures – the better.

So, Here’s How To Create a Colouring Book from Your Photographs using the free online software program: Pixlr!
Just follow the step by step instructions below!
STEP 1
Go to https://pixlr.com/e/ There is no need to download the program, it will allow you work on your colouring book online and to save up to three finished images per day for free. If you want more, click on the sign-up link on the top right of the screen and create an account.

STEP 2
Click on the open image button and find your chosen picture file (previously saved to your computer).

I will be using the Bluenose II picture for this tutorial.
Click on your picture and choose “Open”!

Your picture will be brought into the Pixlr interface.
STEP 3
We will start by turning your picture black and white. Click on the “Adjustment” menu at the top of the page and choose, “Desaturate”! Your picture should now be in grey-scale.


STEP 4
Next, create a second layer of your picture to manipulate…

… by clicking: Layer, Duplicate Layer!
You should notice a second layer appear on the right side “Layers” menu.
Click on the “Adjustment” menu at the top of the page and choose, “Invert”. This will flip your picture to a negative.
.
.
STEP 5
Manipulation Time – Here is where the magic happens!
Click the three dots “…” “Settings” on the Layers Menu. The “Blend Mode” is currently set as “None”. Change it to “Lighter” from the drop down menu.


Don’t Panic!
Your picture may disappear. 🙂
It is OK!
.
.
STEP 6

To make it re-appear we can add a filter.
On the top menu, choose: “Filter”, “Details”, “Gausian Blur”!

Move the slider all the way to the right – 100% Blur and click “Apply”.
.
.
.
.
.
.
STEP 7
Now that we have manipulated it – we will get rid of the second layer, by combining the two. Using the “Layers” “Settings” dots “…” again, click “Merge Down” on the “Settings” pop up! Your picture may be quite light and you will notice you are back to just one layer.


STEP 8
On the top menu, click “Adjustment”, “Levels” and a new pop up will appear. Click and hold the top of the pop up – on the word “Levels” and drag to the right if it is covering your picture.


The “Levels” Pop up shows a graph that looks kind of like a hill with three sliders below it. Click and drag the “Black” slider to the right and let it go right where the hill starts to climb. Your picture should have gotten considerably darker. Then, drag the “Grey” slider to the right – play with this one – move it back and forth until your picture looks like a colouring book page.
When you are happy with the look, click “Apply”.


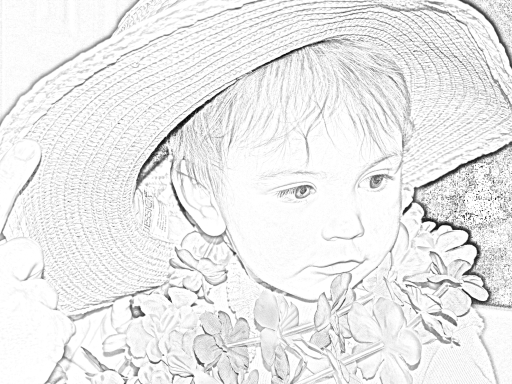
STEP 9
Save your colouring book page! Good Job!


STEP 10
Make a bunch, print them out, staple them together and surprise someone with their own, special, personalized colouring book!


