Finding a “Little Free Library” on our travels is always exciting.
If you have read through any of our blog or other posts you know we love back-roading and looking for new places and adventures. One of my favourite parts of our adventuring is finding little treasures in the most unexpected places. Finding a “Little Free Library” on a dirt road in the middle of nowhere or at a road-side market makes my day. We always carry a few gently-used books in our car, just in case.
Our most recent “Little Library” find was in Greenhill, NS at the end of a driveway on a quiet dirt road. Check out our Pictou County Adventure Post to see some of the other treasures we found on that adventure.

If you want to find a “Little Free Library” but don’t want to leave it to chance – like we usually do – check out The “Little Free Library” Organizations world map and find some near you.
This post may contain affiliate links. This means if you click through and / or make a purchase through one of these links, I may receive a small commission, at no extra cost to you. All opinions are my own. Please read my full disclosure HERE.
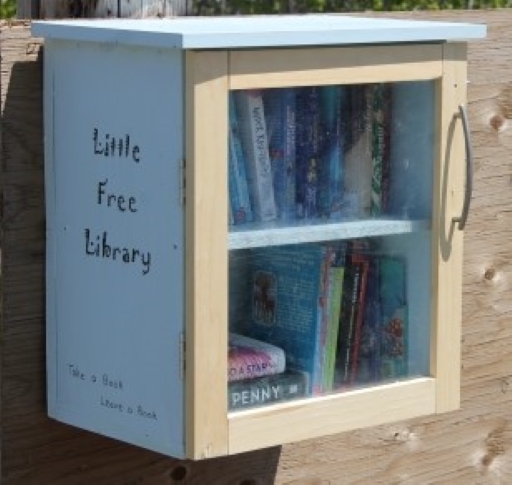
Making A “Little Free Library”
I could have started from scratch and built our library box from fresh new wood but, I love upcycling as much as I love “Little Free libraries” and I had this beautiful (Ok it’s not really beautiful but I knew it would be useful for something) drawer kicking around my workshop just waiting for a new use. The desk leg had broken and had to go but I couldn’t just throw out the drawers. I knew I would find a use for them – eventually!

Clean and Dismantle the Drawer
- Clean – Our drawer has been sitting awhile and needed a good cleaning. I wiped it down with some anti-bacterial cleaner and water and let it dry. Using TSP if your drawer is greasy or stained would be a good idea.
- Remove the bottom – The bottom of my drawer was just heavy cardboard or really thin wood. It just slid into grooves in the sides and was warped and not very tight. I decided to replace it with stronger wood that would firm up the library box and help make it more waterproof. If your drawer bottom is secure and heavy wood, just use it.
- Remove the back – Again, usually I would just leave the back of a drawer but for some reason, the back of this drawer was mounted several inches in from the back. I removed it but, will be using it later as my book shelf.
- Remove all hardware – Our Little Library will not need rails, a drawer stopper or a handle on top – remove all hardware and set it aside – we will be using the handle later and tucking away the rest for use in other projects.
- Fill holes – Fill any holes left by the hardware removal or dings with wood filler and let it dry.


Rebuild Frame with Wood Scraps
You can use new wood, but if you have scraps from other projects – all the better. I had some old 3/4″ pine from loft beds we had made for our daughters many years ago. When they outgrew the beds we dismantled them and have been using the wood in new projects for a number of years now.
- Measure – Measure your drawer and mark your scrap wood to fit. I had to use two pieces of wood for my back (originally the bottom of my drawer) and one for the bottom (originally the back of the drawer).
- Cut – Cut your scrap wood to fit and secure it to the drawer with wood screws. The heavier wood made my drawer much more sturdy and square. (I used the table saw to cut my boards to size but you can easily use a circular or hand saw.
- Reattach the Back as a Shelf – I used the original drawer back as a shelf and secured it in the center of my library with wood screws. Note: Use a level – I didn’t and my shelf is a little tilted – I gives it character – right???


Paint and Varnish
- Sand – Use a sanding block or sandpaper to flatten any extra wood filler you had put in the hardware holes and any sharp corners your frame may have.
- Prime – Give your entire library box a good priming. I used recycled wood – some was previously painted, some raw as was the drawer itself. Priming everything gave me a consistent starting palate and gave me a good base for my paint.
- Paint – Use a good, outdoor paint. Your library will be out in the elements, indoor paint probably won’t hold up.
- Stencil – Stencil, add letter stickers or Freehand paint (like I did) “Little Free Library” “Take a Book, Share a Book” on the side or front of your library box.
- Decorate – Have fun, Be creative! – Decorate your “Little Free Library” to match it’s surroundings or to make it stand out from them…
- Varnish – I gave the entire box two coats of clear varnish. The varnish will help protect your lettering, decorations and the entire library from the elements.


Make the Door
- Measure your library box and cut two side pieces and a top and bottom piece of 1.5″ wood. We had to rip a piece of 1″X2″ on the table saw to make it 1.5″.
- Sand all the pieces well.
- Cut a groove in the back side of each piece with a router, this groove will allow the plexiglass to fit in tight.
- Varnish (or paint) all the door pieces.
- Lay out the door frame pieces and apply glue to the groove.
- Measure and cut plexiglass to fit in the door opening.
- Place the plexiglass in the glued groove and secure the wood pieces together with brackets. (I drilled pilot holes first, so the wood would not split.
- Drill pilot hoes for the door handle and reattach with the screws you removed from the drawer earlier.


Put It All Together
- Attach the door to the library box with small hinges. You may have to drill pilot holes.
- Attach a hook and loop to hold the door shut.
Mount It on a Post
Mount your “Little Free Library” on a post or secure it to a wall or post in a high traffic area.

Share Your Gently-Used Books with Others

Note: I used one of the other drawers last fall to make a library shelf on my side deck. It holds my books and a drink quite nicely!


I used these vinyl siding hooks from Amazon to hang it on the wall without having to put holes in my siding – I love them!

Do you have a “Little Free Library” in your area? Send us a picture and the location in the comments below.
Check out some of our other “How To…” posts below.
- How to Upcycle a Old Desk Drawer into a Wonderful “Little Free Library”!
 We love “Little Free Libraries”. We look for them on all of our adventures. Now we; finally, have one of our own! You can too! Here’s How!
 - How To Update a Worn Out Patio Set
 Nautical Patio Set – Update your tired, worn-out patio set with a new nautical theme. DIY cushion covers, lemonade tray and candle holders.
 - How To Create a Colouring Book from Your Photographs
 Let’s have some fun learning how to create a colouring book from your photographs.


