Upcycled Nautical Patio Set!
Help! My patio needs updating – Hmmm, How about a nice, “new” Nautical Patio Set!
As I was putting away all the winter toys and necessities and pulling out the spring and summer things I realized my patio conversation set had seen better days. The set has been in our shed for the last few years awaiting an upgrade so I decided now was the perfect time.
I have a dream to live on the ocean – I do live pretty close and can actually see the waters of the Northumberland Strait – distantly – from my deck. But, I want to be right there – waking up every morning to the sun sparkling on the water would keep me in a perpetual happy place.
I am incredibly lucky, even if I am not right on the shore, I am surrounded by beautiful beaches and shoreline trails and can easily visit everyday.
So, even tho’ I am not on the water, I like to decorate my house (and deck) in a nautical theme so I can pretend I am at the “Beach House”!
This post may contain affiliate links. This means if you click through and / or make a purchase through one of these links, I may receive a small commission, at no extra cost to you. All opinions are my own. Please read my full disclosure HERE.
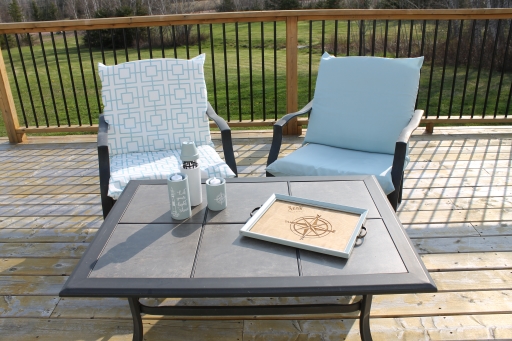
Making New Cushion Covers
The conversation set itself is in pretty good shape, it is weathered a little but the metal and ceramic tiles in the table seem to be holding up fine.

The cushions; however, need help! The covers are stained and sun-rotted right through.

I purchased cloth shower curtains to make the new cushion covers – they work great – they repel water and if they do get wet, they dry quickly and don’t seem to fade and weather as much as my old covers did!

The cushion covers are quite easy to make:
HOW TO:
1. Remove the old cover and discard. Make sure the inside cushion materials are clean and usable. Mine were fine!


Each shower curtain covered two of my cushions (with some left over to make pillows or use in other projects) and as I had 8 cushions to cover, I bought 4 shower curtains (three solid nautical blue and one patterned to match and give my set a little contrast).
2. Lay your shower curtain, good side up, on a large flat surface and place the cushion centered on one end.

3. Cut the fabric (side to side) a little wider than your cushion. Leaving enough overhang on each side to be able to stich with a 1/4″ seam allowance. This will allow you to get two cushions, or more out of each curtain. Do not cut the fabric lengthwise, you will use the sides to fold over your cushion.

4. Fold the sides of the shower curtain over your cushion, overlapping the ends.


5. Pin the ends into place and remove the cushion from inside the fabric. Stitch down both sides, keeping all edges together.


6. Turn the cushion cover right side out and tuck in your cushion form. The covers may not be as tight and form fitting as the original covers, but they will still look great!

These covers stay on well, the more you overlap the back edges the more secure they stay. The covers are also easy to remove and wash when needed.

Nautical Patio Set Centerpiece
My neighbour was doing some down-sizing and found a cute set of metal candle holders that she once used on her patio and an old picture frame tucked away in a closet. They no longer fit her decor style (they were a dark grey metal – sorry I painted them before taking the picture) and as she knows I love crafting and upcycling she brought them over and challenged me to do something with them. Perfect timing: I paired them with a few things kicking around my craft room and made a nautical patio set to go with my new cushions.

Upcycled Nautical Tray
MATERIALS:
- Old picture frame
- Thin wood (I used meranti board (underlay)), I find it is great to laser or paint on and fits wonderfully in a picture frame.
- decorative handles
- Laser engraver or paint, stencils, etc.
HOW TO:
- Remove the glass and baking from your picture frame, make sure it is clean, give it a few coats of a beautiful nautical blue paint and add your decorative handles to the ends.

2. Measure and cut your wood sheet to the correct size to fit in your picture frame.

3. Laser engrave or paint a nautical design on your board. I lasered “SEAS the Day” and a compass rose image that I downloaded from Shutterstock on a free trial. (I also downloaded the lighthouse image, shown later, during my free trial) Note: Make sure any images you use are free for personal use – or commercial use if you plan to sell your products.

4. Place the finished wood into the picture frame in place of the glass and backing. Meranti board will often fit into a picture frame with the glass, making your trays washable and your paint and/ or lasered designs safe from spills.
This little tray comes in very handy carrying drinks and snack out to the patio.
Upcycled Candle Set
MATERIALS:
- Metal candle holders – ready for upcycling (or you could use driftwood or tree stems).
- Paint or a Cricut machine and vinyl
- Tea Lights
- Small clay pot
- Piece of a plastic berry basket or wire mesh or some kind (chickenwire or small grid wire would work)


HOW TO:
1. Paint 2 of your candle holders, I used the same nautical blue colour as on my tray. (If you are using driftwood or tree branches drill a hole in the top and whittle out an indent for your tea lights).
2. Cut your nautical design(s) from vinyl and secure to two of your candle holders. I used the same compass rose I lasered onto my tray and made a saying with the lighthouse image from Shutterstock mentioned above, adding text in Cricut design space. You could also paint your design.

3. For the lighthouse, I painted the candle holder white, and a small clay pot nautical blue. I added a piece of plastic berry basket and perched the clay pot on top. My clay pot kept slipping down too far so I lined it with a bit of tinfoil. You could line / stuff in with anything but I wanted to make sure that if anyone lit a real candle in my lighthouse it would be safe.


Have you tried this project or other nautical patio decor? Tell us all about it in the comments below.

Check out our other craft and How To Posts:
- Nova Scotia Sand Dollar Secrets
 The sand dollar: this beautiful, little invertebrate hides a few secrets inside it’s shell! Read on to find out it’s hidden treasures.
 - How to Upcycle a Old Desk Drawer into a Wonderful “Little Free Library”!
 We love “Little Free Libraries”. We look for them on all of our adventures. Now we; finally, have one of our own! You can too! Here’s How!
 - Why kids Should Hear, “Play with Your Food” – Recipes for Learning and Fun!
 “Don’t Play with Your Food!” How many times did you hear that as a kid? The truth is, playing with their food is good for babies and young children and a natural thing to do!
 - How To Update a Worn Out Patio Set
 Nautical Patio Set – Update your tired, worn-out patio set with a new nautical theme. DIY cushion covers, lemonade tray and candle holders.
 - 15 DIYs and Ideas to Inspire your Spring Decor
 Doing some Spring Cleaning – clean out all the dark, wintery spaces in your home and brighten them up with new and vibrant Spring decor.
 - How To Create a Colouring Book from Your Photographs
 Let’s have some fun learning how to create a colouring book from your photographs.
 - How To Make a Spring Wreath for Your Home
 How To Make a Bicycle Wheel Spring Wreath to Decorate Your Home


